Making Knives with Files
 |
| Flat File Used To Make Homemade Throwing Knife |
 |
| File Throwing Knife |
In order to take the temper out of a file you need to heat it up to around 500 degrees and then let the file cool as slowly as possible. This will make the metal a lot softer and easier to cut and work with. The best way to do this is with a good bed of coals make by a good camp fire. Throw the knife File on top of the coals and surround it with more wood leaving it to burn down for at least an hour. After you remove your piece of metal from the coals the key point is letting the file cool down really slow. If cooled down to fast you will re-temper the file and need to start all over. The best way to do this is just letting the fire burn out before you take he knife out, this takes a lot longer but the metal is going to be much easier to work with.
 |
| The Same Flat File After I was Done Making Two Different Knives |
After I formed the new knife and had a good edge started, I decided to re-harden the knife by heating the metal up in until it was glowing red and no longer magnetic. I then dropped the knife in a cup of water making sure to do it real fast and insure a good proper hardening throughout the metal. I then completed the tempering process for the knife by putting it in the oven on 400 degrees for three additional hours.
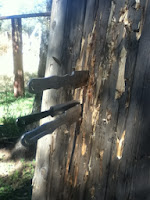
My file throwing knife was complete and I had to go give it a try. I threw this knife and a few others for a little while and was truly impressed because my store bought knives got a few big nicks in the blade from throwing, but my file knife was still absolutely perfect and proved much stronger. Leaving partial ribs still left from the old file in the middle of the new knife also proved to be a good idea because of its firm grip when throwing while holding onto the blade.
 |
| Homemade Throwing Knife Sticks with Superior Force Compared to Store-Bought Ones! |
 |
| Homemade Necklace Knife using piece of a file. |

I really like this knife. Thanks for sharing with us great blog. I also like the content about knife.
ReplyDeleteotf blades